Before downloading
QFindr is a desktop application at the moment available exclusively on Windows OS. More specifically, Windows 7 or higher is required for QFindr to work properly. If you are not sure how to check what version of Windows your device has, you can visit Microsoft support page where instructions on how to do this can be found.
Microsoft Word
QFindr supports search through a wide variety of file types, among which an older .doc extension. For .doc files to be searchable, you will need Microsoft Word (2013 or later) installed on your device. In case you do not have Microsoft Word installed, .doc files will not be indexed, but all other file types and functionalities will work normally.
If you liked our Premium version with Outlook search feature, you will need Microsoft Outlook desktop application (2013 or later) installed. Once the app is set up, QFindr will index all messages and attachments in all accounts and folders without requiring authentication.
Before installing
Activation key
Once you have decided to use QFindr and registered via Home page, you got an Activation key from us. This key will be needed later on to enable Qfindr after the installation so make sure to keep it.
Installation
To install QFindr, double click on the .exe file you downloaded after registering. Once the installation starts you may get a blue screen saying Windows protected your PC if you are using Windows 10. This is just a note from Windows Defender that appears only on this version of Windows if an app is not Microsoft-checked. However, if you click on More info, a publisher together with the app name will appear, and you can select Run anyway to safely install QFindr.
The installation will then proceed and when finalized, a window will pop up. In this window you can select what folders you would like QFindr to index after the required restart. By default, C:/Users is selected, but you can remove it by clicking on x next to the folder or add any other folder by clicking on Add folder. Note that you do not have to choose any folders at this stage nor is this by any means the final choice. You can remove or add new folders at any point in time through easily accessible QFindr configuration. Folders selected at installation are those QFindr will automatically start indexing upon next Windows startup.
Another configurable field in the pop-up window is the Activation key mentioned earlier. Enter here your activation key and choose to either restart your device now or later. A few minutes after the restart QFindr will automatically start indexing chosen folders. If you selected no folders in the previous step, you can manually add them after the restart (see Configuration setup below).
Configuration setup
QFindr offers a range of configurable parameters and functionalities easily available to users. To access the configuration panel, QFindr has to be running first. If you have just restarted your device after installation, QFindr will already be running. Otherwise, if not running, a manual start is required.
Once QFindr is ready, right-click on QFindr icon in the Windows taskbar in the bottom of the screen. Sometimes, QFindr icon can be hidden under the upwards-pointing arrow in the right part of the taskbar so left-click on it to reveal the hidden icons.
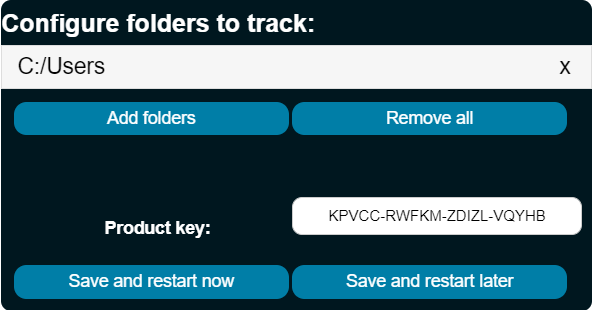
Then, a window will appear, where Open config field should be selected. A pop-up dialog box will then open with all configurable parameters. Besides the two fileds mentioned in the Installation guide - folders to index and activation key - there are five more configurable options explained in detail below the figure.

Scan Outlook is an on/off feature available to users with Premium license. It indexes all mails and attachments in all accounts set up in your Outlook desktop app.
Automatic rescan is an on/off function available to all users. By turning it off, no file tracking will be performed - that is, no new files (or emails) will be indexed nor will the content or metadata, such as its location, of the existing files (or emails) be updated. A manual rescan can be triggered by user by right-clicking on the QFindr icon in the taskbar and selecting Rescan and index files. By turning automatic rescan on, all file (and email) changes will be tracked according to the value of Rescan frequency feature.
Rescan frequency is a dropdown menu of time periods specifying how often new or altered files (and emails) should be tracked. This feature depends on the needs of an user and it should be noted that a frequent rescan of many new or changed files (and emails) can present a performance overhead.
OCR images is an on/off feature available to users with Standard license. It extracts texts from images - the clearer the text is shown in the image, the better the extraction will work. Note also that turning this feature on can prolong overall rescan in case you have many images in your tracked folders.
OCR PDFs is another on/off feature available to users with Standard license. It extracts text from PDFs which contain images such as scans, and can also prolong your overall rescan if many PDF files are present.
High performance mode is an on/off feature available to users with Premium license. It allows for faster processing of images and PDF files containing scans and images. This feature can be of particular use to you who have many such files to speed up the initial scan or any following rescan in case you generate many new of these files.
Using QFindr
Search
Using QFindr is simple and easy. Once QFindr is running, you can use a keyboard shortcut Ctrl + Alt + Space for a search bar to appear. Then just start typing in and results will appear and adjust in real time. The results are sorted by relevance to your query, but in case of a lot of results you can use a scroll bar to the right to navigate through the results if necessary.
The results will appear with the file name (or a subject in case of emails) in the largest font, followed by a creation date and file location (or recipients in case of emails) below. Also, an icon of a file type or an email will appear to the left of a result.
You can navigate through results using up and down keyboard arrows, and open a highlighted result by pressing Enter. Alternatively, you can hover a mouse over a result and left-click it to open. For files there will be a folder icon to the right of each result which can be clicked using a mouse to open and highlight that file in its parent folder.
Plenty minor features are available, e.g. when the search bar is empty, you can naviagate using up and down keyboard arrows to your previous and following queries. Some plugins like calculator, computer lock etc. can also be accessed using classical keywords (e.g. lock), typing in numbers and so on.
An example of a search is illustrated in the video below.
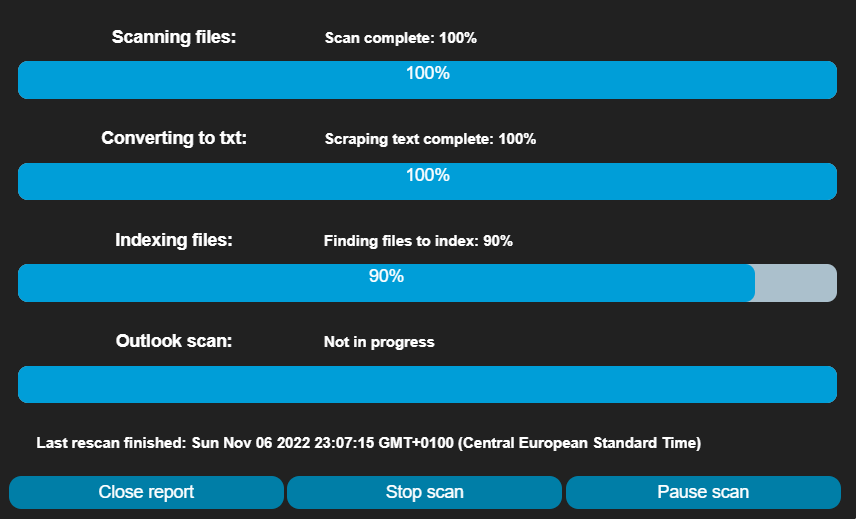
Monitoring rescan
You can also at any time during a rescan monitor and manipulate its progress. By clicking on the QFindr icon in the taskbar and selecting Scan progress report you will access a window like the one below. Here you can then select to start, pause (or resume) a rescan however you want.
Note that the performance of the initial scan can highly depend on types and total size of your files. For instance, having a lot of PDFs with scans may imply longer processing time, but this can also be alleviated using Premium High performance mode feature.